A ConfigMgr Admin’s Guide to WOL Magic Packet: Part Two
In part one of this guide, I walked you through the steps you’ll need to follow to enable WOL Magic Packet on your site server. Now I will go through client settings you may need to change to get this working on individual computers.
First off, I would highly recommend you have standardized drivers and BIOS versions. Throughout the years, I’ve found that WOL Magic Packet tends to be a setting that’s very common for manufacturers to screw up in new driver and BIOS releases. Whenever you put a new BIOS version or NIC driver out in your environment, make sure you test to make sure you can wake the computer from a powered off state, sleep mode, and a powered off state after a power loss.
I’m not going to be able to provide you screen shots for all the different BIOS versions out there, since it changes by version number, manufacturer, and model. Generally the WOL settings are found under the power settings, so make sure WOL is enabled there.
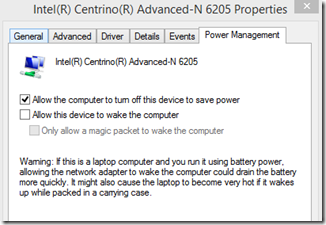
On to the Windows settings! Go to Control Panel, Network and Sharing Center, Change Adapter Settings (On the left), Right click on your Ethernet device, click properties, click configure, and here you should see the Power Management tab.
These boxes (theoretically) will only affect the computer during sleep mode. When a computer is powered off, Windows cannot do anything in terms of turning the computer back on. Your BIOS settings are what affect the computer when it is powered off. The third box is up to you if you want to check it or not. Magic packet will work to wake up the computer, but so will other technologies. If you only want the computer to wake up the computer with Magic Packet, check the third box.
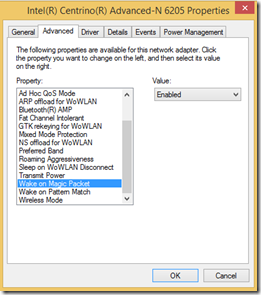
Now, go to Advanced, and look for Wake On Magic Packet. Make sure this is enabled.
If you are using an Intel NIC, there MAY be another setting there called Wake on Magic Packet from power off state. This could also show up on the Power Management tab. Enable this setting also to make sure you can wake up the computer. This particular setting affects the computer when it is powered off, not sleep mode. Windows can put the NIC in a low power mode when the computer is shut down, and if it does you won’t be able to wake up the computer. From what I’ve seen, most Intel NICs have this setting, but you don’t always see the option in the properties of the NIC. If you don’t see it, you will need to enable it in the registry. More on that below…
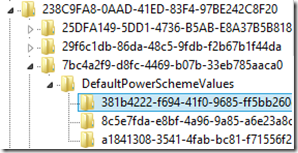
Now, for the two settings Microsoft really hides on us. If a computer is in sleep mode, and you wake it with a magic packet, Windows will turn the computer back off after 2 minutes. This doesn’t really give ConfigMgr any time to do anything, so you will want to change that to something more reasonable. I usually change it to 20 minutes. The registry key is located here: HKEY_LOCAL_MACHINESYSTEMCurrentControlSetControlPowerPowerSettings238C9FA8-0AAD-41ED-83F4-97BE242C8F207bc4a2f9-d8fc-4469-b07b-33eb785aaca0 and you can see the description of this key is “Idle timeout before the system returns to a low power sleep state after waking unattended.” If you are following along in the registry, expand DefaultPowerSchemeValues, and you’ll see a few GUIDs. Each GUID is a different Power Plan, so by default there will be three. You only need to change the setting for your current Power Plan for it to take effect.
There is an ACSettingIndex and DCSettingIndex, which are for plugged in and battery. The decimal version of these keys shows you how many seconds the computer will wait before going back to sleep. The default is 120 seconds. I generally just add a 0 to make it 20 minutes, or 1200 seconds. Change it for ACSettingIndex for plugged in, and the DCSettingIndex if you want to change the on battery value.
If you want, you can go to all the computers in your environment and change these settings manually, or you can use a script to do it! The more I use compliance settings, the more I like them, so I’ll walk you through how to make a compliance setting for this.
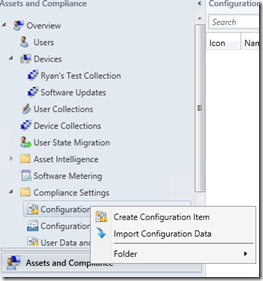
Go to Assets and Compliance in the ConfigMrg console, expand Compliance Settings, right click on Configuration Items, and click Create Configuration Item.
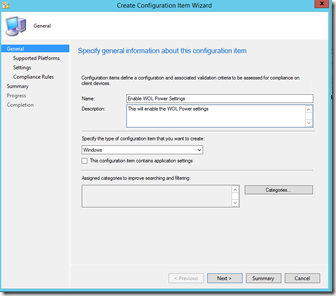
On this first screen, just fill out a descriptive name and if you want, put something in the Description.
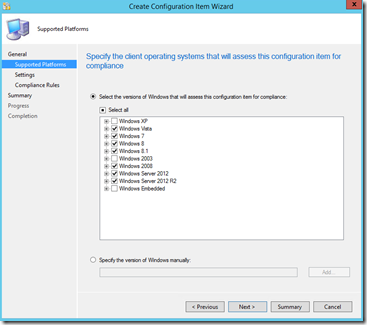
On the second screen choose what OS you want this to run on. I don’t know if this will work on Windows XP or Server 2003 or Windows Embedded, so I won’t enable it for those OS.
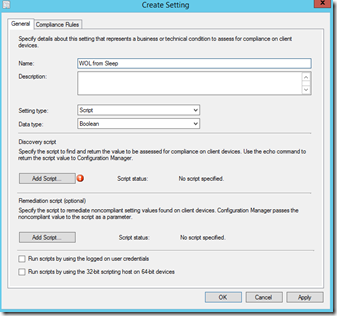
Now, the settings screen. Click New and give this a name. The first setting I’m going to set is the one that allows the computer to wake from a sleep state. The setting time should be Script, and Data Type should be Boolean.
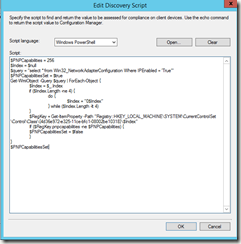
Now, click on Add Script under discovery script, make sure the dropdown is Windows PowerShell, and add this script:
$PNPCapabilities = 256
$Index = $null
$query = "select * from Win32_NetworkAdapterConfiguration Where IPEnabled = 'True'"
$PNPCapabilitiesSet = $true
Get-WmiObject -Query $query | ForEach-Object {
    $Index = $_.Index
	if ($Index.Length -ne 4) {
		do {
			$Index = "0$Index"
		} while ($Index.Length -lt 4)
	}
	$RegKey = Get-ItemProperty -Path "Registry::HKEY_LOCAL_MACHINE\SYSTEM\CurrentControlSet\Control\Class\{4d36e972-e325-11ce-bfc1-08002be10318}\$Index"
	If ($RegKey.pnpcapabilities -ne $PNPCapabilities) {
    	$PNPCapabilitiesSet = $false
	}
}
$PNPCapabilitiesSet
The first line, $PNPCapabilities = 256 will check all three boxes on the Power Management tab:
If you just want the first two boxes checked, set it to 0.
Now, the next series of lines does a WMI query to get the current NIC. It then makes sure the length of the index number is 4 characters. If it isn’t (and it usually isn’t) it will add zeroes to the front of the number until it is 4 characters. Now, it goes to the registry here: HKEY_LOCAL_MACHINESYSTEMCurrentControlSetControlClass{4d36e972-e325-11ce-bfc1-08002be10318} and then uses the index number to find the correct NIC key. The PNPCapabilities property handles all three of those check boxes, so it sets it to either 256 or 0, depending on which boxes you want checked.
Click Ok and now click Add Script… under Remediation script (optional), change the script language to Windows Powershell, and add this script:
$PNPCapabilities = 256
$Index = $null
$query = "select * from Win32_NetworkAdapterConfiguration Where IPEnabled = 'True'"
Get-WmiObject -Query $query | ForEach-Object {
    $Index = $_.Index
	if ($Index.Length -ne 4) {
		do {
			$Index = "0$Index"
		} while ($Index.Length -lt 4)
	}
    Set-ItemProperty -Path "HKLM:\SYSTEM\CurrentControlSet\Control\Class\{4d36e972-e325-11ce-bfc1-08002be10318}\$Index" -Name "PNPCapabilities" -Value "$PNPCapabilities" -Type "DWORD" -Force
}
Set PNPCapabilities to the same number you set in the detection script, and then click Ok. This script changes the registry key to the correct setting. Now, click on the Compliance Rules tab, and click New. We have made the detection script, and now we are going to tell ConfigMgr what to do with that detection script. Name the rule whatever you want, Rule Type should be Value, and “the following values:” should be True. If you want to remediate (change the setting to the correct setting) then check the box. This will run the remediation script I had you create earlier.
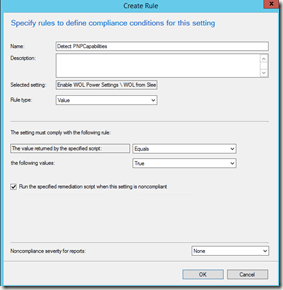
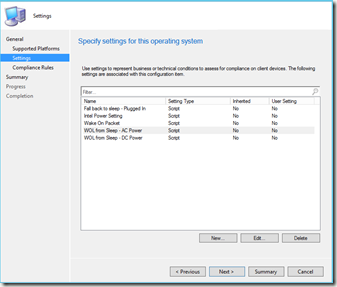
Click Ok, and Ok, and now you are back to the Settings screen. We only created scripts for one of four settings, so now create settings for Wake on Magic Packet with these scripts:
Detection:
$Index = $null
$query = "select * from Win32_NetworkAdapterConfiguration Where IPEnabled = 'True'"
$WakeOnPacketSet = $true
Get-WmiObject -Query $query | ForEach-Object {
    $Index = $_.Index
	if ($Index.Length -ne 4) {
		do {
			$Index = "0$Index"
		} while ($Index.Length -lt 4)
	}
	$RegKey = Get-ItemProperty -Path "Registry::HKEY_LOCAL_MACHINE\SYSTEM\CurrentControlSet\Control\Class\{4d36e972-e325-11ce-bfc1-08002be10318}\$Index"
	If ($RegKey."*WakeOnMagicPacket" -ne 1) {
    	$WakeOnPacketSet = $false
	}
}
$WakeOnPacketSet
Remediation:
$Index = $null
$query = "select * from Win32_NetworkAdapterConfiguration Where IPEnabled = 'True'"
Get-WmiObject -Query $query | ForEach-Object {
    $Index = $_.Index
	if ($Index.Length -ne 4) {
		do {
			$Index = "0$Index"
		} while ($Index.Length -lt 4)
	}
    Set-ItemProperty -Path "HKLM:\SYSTEM\CurrentControlSet\Control\Class\{4d36e972-e325-11ce-bfc1-08002be10318}\$Index" -Name "*WakeOnMagicPacket" -Value "1" -Type "String" -Force
}
The property you want to change here is *WakeOnMagicPacket, and it needs to be 1 for enabled.
To change the “Idle timeout before the system returns to a low power sleep state after waking unattended” plugged in value, here is the detection script:
try {
    $SecondsToWait = 1200
    $ACSettingSet = $true
    $strQuery = "Select InstanceID from Win32_PowerPlan where IsActive = 'true'"
    $PowerPlanInstanceID = (Get-WmiObject -Query $strQuery -Namespace root\cimv2\power).InstanceID.ToString()
    $RegEx = [RegEx]"{(.*?)}$"
    $GUID = $RegEx.Match($PowerPlanInstanceID).Groups[1].Value
    $RegKeys = Get-ItemProperty -Path "Registry::HKEY_LOCAL_MACHINE\SYSTEM\CurrentControlSet\Control\Power\PowerSettings\238C9FA8-0AAD-41ED-83F4-97BE242C8F20\7bc4a2f9-d8fc-4469-b07b-33eb785aaca0\DefaultPowerSchemeValues\$GUID"
    If ($RegKeys.AcSettingIndex -ne $SecondsToWait) {
        $ACSettingSet = $false
    }
    return $ACSettingSet
}
catch {
    return $false
}
And here is the remediation script:
$ErrorActionPreference = "SilentlyContinue"
$SecondsToWait = 1200
$strQuery = "Select InstanceID from Win32_PowerPlan where IsActive = 'true'"
$PowerPlanInstanceID = (Get-WmiObject -Query $strQuery -Namespace root\cimv2\power).InstanceID.ToString()
$RegEx = [RegEx]"{(.*?)}$"
$GUID = $RegEx.Match($PowerPlanInstanceID).Groups[1].Value
New-Item -Path "HKLM:\SYSTEM\CurrentControlSet\Control\Power\PowerSettings\238C9FA8-0AAD-41ED-83F4-97BE242C8F20\7bc4a2f9-d8fc-4469-b07b-33eb785aaca0\DefaultPowerSchemeValues\$GUID"
Set-ItemProperty -Path "HKLM:\SYSTEM\CurrentControlSet\Control\Power\PowerSettings\238C9FA8-0AAD-41ED-83F4-97BE242C8F20\7bc4a2f9-d8fc-4469-b07b-33eb785aaca0\DefaultPowerSchemeValues\$GUID" -Name "AcSettingIndex" -Value "$SecondsToWait" -Type "DWORD" -Force
The script finds the current power plan through WMI, uses regex to get the GUID, and then changes the correct setting.
Lastly, the setting for Wake on Magic Packet from power off state. I believe this setting is Intel specific, so if you don’t want to roll this setting into the Windows Compliance Items, you will need to make a new Compliance Item for your Intel NIC computers. The property here is called EnablePME and it needs to be set to 1 for it to be enabled.
Here is the detection script:
$Index = $null
$query = "select * from Win32_NetworkAdapterConfiguration Where IPEnabled = 'True'"
$EnablePMESet = $true
Get-WmiObject -Query $query | ForEach-Object {
    $Index = $_.Index
	if ($Index.Length -ne 4) {
		do {
			$Index = "0$Index"
		} while ($Index.Length -lt 4)
	}
	$RegKey = Get-ItemProperty -Path "Registry::HKEY_LOCAL_MACHINE\SYSTEM\CurrentControlSet\Control\Class\{4d36e972-e325-11ce-bfc1-08002be10318}\$Index"
	If ($RegKey.EnablePME -ne 1) {
    	$EnablePMESet = $false
	}
}
$EnablePMESet
And here is the remediation script:
$Index = $null
$query = "select * from Win32_NetworkAdapterConfiguration Where IPEnabled = 'True'"
Get-WmiObject -Query $query | ForEach-Object {
    $Index = $_.Index
	if ($Index.Length -ne 4) {
		do {
			$Index = "0$Index"
		} while ($Index.Length -lt 4)
	}
    Set-ItemProperty -Path "HKLM:\SYSTEM\CurrentControlSet\Control\Class\{4d36e972-e325-11ce-bfc1-08002be10318}\$Index" -Name "EnablePME" -Value "1" -Type "String" -Force
}
Once you are done, your screen should look something like this:
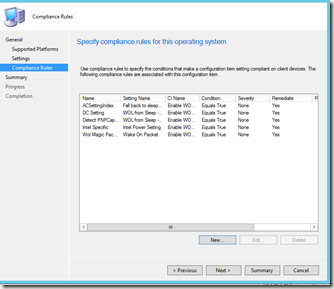
Click Next, and your screen should now look like this:
There should be one Compliance Rule for each Compliance Setting. You set these in the Compliance Setting in that second tab:
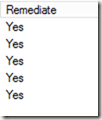
If you don’t have one per setting, you will need to create one for the missing setting. To me, it’s easier to just go back to settings, edit the one that’s missing, and add it there. Make sure you are remediating the ones you want to remediate. You can quickly see which ones are being remediated in the Remediate column.
Click Next, and Next to create this.
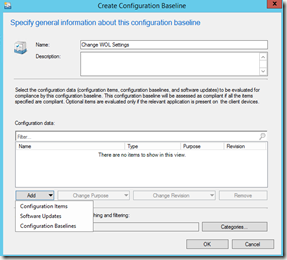
Now that it is created, you will need to create a configuration baseline to deploy. Right click on Configuration Baselines, select Create Configuration Baseline:
Name this something descriptive and then click Add, Configuration Items
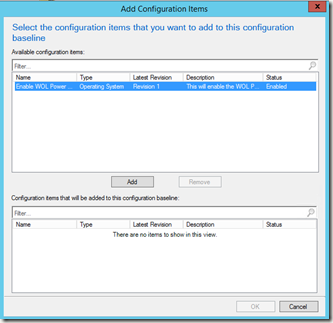
Select the configuration item you created, and then click Add
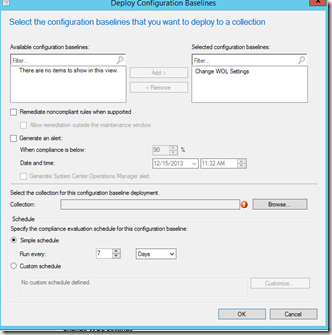
Click Ok, and then Ok to create it. Right click on the new baseline and select Deploy. Now you are going to see a very different Deploy screen than you normally see.
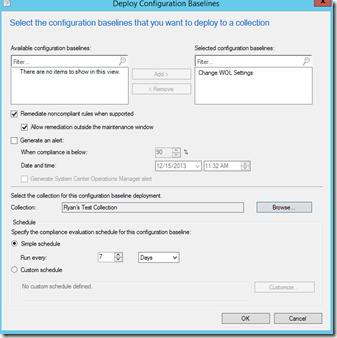
On here, check Remediate noncompliance rules when supported if you want to remediate, and check the one below that if you want to remediate outside of maintenance windows. Since you are only changing a few registry keys, it is probably ok to do this outside of a maintenance window. If you want to generate an alert for this, you can set those settings next. Now select your collection, and the schedule you want this deployment to run on. I’m going to set it to run once a week. This way if a power plan is changed, or a network driver is updated you won’t have to worry about going back and changing those settings again.
Click Ok and you are done! The configuration baseline is all set.
In the next part, I’ll go through some troubleshooting steps you can go through for those computers that don’t wake up.



Leave a Comment